

Introduction
What is Photography?
Photography is the art, science, and practice of creating durable images by recording light, either electronically using an image sensor or chemically using a light-sensitive material like photographic film. The word ‘photography’ is derived from the Greek words ‘photos,’ meaning light, and ‘graphein,’ meaning to draw. It was first coined by Sir John Herschel in 1839, the year the photographic process became public.
Definition and Origin of the Word ‘Photography’
The term ‘photography’ combines two Greek words: ‘photos’ (φῶς), meaning light, and ‘graphê’ (γραφή), meaning drawing or writing. This etymology reflects the fundamental process of photography: capturing light to create images. Sir John Herschel, an English scientist, introduced the term in 1839, cementing its place in both the artistic and scientific lexicons.
Brief History of Photography
Photography has a rich and fascinating history, spanning over a millennium of human innovation. The journey began with the camera obscura, a simple optical device known to ancient civilizations like the Greeks and Chinese. This device projected an image of its surroundings onto a screen, albeit upside down.
The real breakthrough came in the early 19th century with the development of chemical processes that could capture and retain images. In 1826, Joseph Nicéphore Niépce created the first permanent photograph using a process called heliography. However, it was Louis Daguerre’s invention of the daguerreotype in 1839 that made photography accessible to the public. Daguerreotypes produced sharp, detailed images on silver-plated copper sheets.
Following the daguerreotype, the field of photography saw rapid advancements. In 1841, William Henry Fox Talbot introduced the calotype process, which allowed for the creation of multiple copies from a single negative. This was a significant leap towards modern photographic techniques.
The invention of roll film by George Eastman in 1888 revolutionized photography, making it more accessible and portable. Eastman’s Kodak camera, marketed with the slogan “You press the button, we do the rest,” democratized photography, allowing amateurs to capture moments without needing extensive technical knowledge.
The 20th century witnessed further innovations, including the development of color photography, the rise of digital cameras, and the advent of smartphones with built-in cameras. Today, photography is a ubiquitous part of daily life, enabling people to document and share their experiences instantly.
Intended Audience
This article is intended for non-technical individuals who are interested in learning the basics of photography. Whether you’re a hobbyist looking to capture beautiful moments, a parent wanting to document your children’s growth, or someone considering photography as a potential side hustle, this guide will provide you with the foundational knowledge to get started. No prior experience with photography is necessary, as this article aims to break down complex concepts into easily understandable terms and offer practical advice for beginners.

The Joy of Photography
Why Photography is an Engaging and Enriching Hobby
Photography is more than just a means of recording moments; it is a deeply engaging and enriching hobby that offers numerous benefits. Here’s why photography captivates so many people around the world:
Creative Expression
Photography is a powerful medium for creative expression. It allows individuals to convey emotions, tell stories, and share their unique perspectives. Through composition, lighting, and subject matter, photographers can transform ordinary scenes into extraordinary images. This creative process is fulfilling and stimulates the imagination, encouraging photographers to see the world in new and innovative ways.
Photography also offers a variety of genres and styles, from abstract and surreal to documentary and portrait photography. This diversity means that photographers can continuously experiment and evolve, keeping their passion fresh and exciting.
Capturing Memories
One of the most cherished aspects of photography is its ability to capture and preserve memories. Photographs serve as visual diaries, chronicling significant moments, milestones, and everyday experiences. They allow us to relive joyous occasions, reflect on personal growth, and remember loved ones.
Photography also plays a crucial role in family history. Generations can look back at photographs to understand their heritage and see the world through the eyes of their ancestors. This connection to the past provides a sense of continuity and belonging.
Exploring the World and Different Perspectives
Photography encourages exploration and curiosity. With a camera in hand, even familiar surroundings can become a playground for discovery. Photographers often find themselves venturing into new places, observing details they might have otherwise overlooked, and appreciating the beauty in the mundane.
Travel photography, in particular, opens up a world of adventure. It enables photographers to document diverse cultures, landscapes, and lifestyles, fostering a deeper understanding and appreciation of the world’s richness and complexity. Through the lens, photographers can share their journeys and inspire others to explore.
Community and Social Connections
Photography has a strong social component, connecting people with shared interests. Photography clubs, online forums, social media groups, and workshops offer opportunities to meet like-minded individuals, exchange ideas, and collaborate on projects. These communities provide support, constructive feedback, and inspiration, helping photographers improve their skills and grow their passion.
Exhibiting and sharing photographs can also lead to meaningful interactions and friendships. Whether participating in local art shows or sharing work on social media platforms like Instagram and Flickr, photographers can reach a global audience and form connections across cultural and geographic boundaries.
The joy of photography lies in its ability to enrich lives through creative expression, memory preservation, exploration, and social connection. It is a hobby that not only enhances one’s artistic skills but also fosters a deeper appreciation for the world and the people in it. Whether you’re capturing the smile of a loved one, the majesty of a sunset, or the intricate details of a flower, photography offers endless opportunities for engagement and enrichment.

Learning Photography
Reasons to Learn Photography
Photography is a versatile and rewarding skill that can significantly enhance your personal and professional life. Here are some compelling reasons to learn photography:
Personal Fulfillment
Photography provides immense personal satisfaction. Capturing a stunning landscape, a candid moment, or a beautifully composed portrait brings a sense of accomplishment. Each photograph you take is a tangible representation of your creativity and effort. This fulfillment is not just about the final image but also the journey of learning and mastering new techniques, which can be both challenging and gratifying.
Moreover, photography can be a therapeutic and meditative practice. Focusing on your subject and immersing yourself in the creative process can reduce stress and enhance mental well-being. It offers a way to slow down, observe, and appreciate the world around you, fostering mindfulness and a deeper connection to your surroundings.
Improving Technical Skills
Learning photography involves understanding various technical aspects, such as exposure, composition, lighting, and post-processing. These skills require a blend of theoretical knowledge and practical application, making photography a continuous learning experience. As you delve into these technicalities, you develop problem-solving skills and a meticulous eye for detail.
Mastering the functions of a camera, such as adjusting aperture, shutter speed, and ISO, helps you take control over your images. Understanding these elements allows you to manipulate light and create the desired effects, enhancing the overall quality of your photographs. This technical proficiency can also boost your confidence in your abilities and encourage you to tackle more complex photographic challenges.
Enhancing Creativity
Photography is a powerful tool for unlocking and enhancing creativity. It encourages you to see the world differently and find beauty in everyday scenes. Experimenting with different styles, angles, and compositions helps you develop a unique visual language and express your artistic vision.
Engaging in creative photography projects, such as themed photo series or daily photo challenges, stimulates your imagination and pushes you to think outside the box. By constantly seeking new perspectives and innovative techniques, you expand your creative boundaries and discover new ways to communicate your ideas visually.
Potential for Professional Growth
Photography can also open doors to professional opportunities. Whether you’re considering a full-time career or looking to earn extra income, photography offers various avenues for monetization. Professional photographers are in demand for events, portraits, commercial work, and more. With a solid portfolio and strong technical skills, you can establish yourself in the competitive photography market.
Freelance photography allows for flexibility and the ability to work on diverse projects. Additionally, selling your photos on stock photography websites, creating online tutorials, or offering photography workshops can generate passive income. The skills you gain from photography, such as attention to detail, creativity, and technical proficiency, are also transferable to other professions, enhancing your overall employability.
Learning photography is a journey that offers numerous benefits, from personal fulfillment and improved technical skills to enhanced creativity and professional growth. Whether you’re capturing the beauty of nature, documenting special moments, or exploring new artistic avenues, photography enriches your life in countless ways. Embrace the challenges and joys of photography, and you’ll find that the rewards are well worth the effort.

Types of Cameras
Overview of Camera Types
Choosing the right camera is an essential step in your photography journey. Each type of camera has its unique features, advantages, and limitations, catering to different needs and preferences. Here’s an overview of the most common types of cameras available today:
Point-and-Shoot Cameras
Point-and-shoot cameras are compact and user-friendly, making them an excellent choice for beginners and casual photographers. These cameras are designed for simplicity, with automatic settings that handle focus, exposure, and flash. While they typically lack the advanced features of more sophisticated cameras, their portability and ease of use make them perfect for everyday snapshots and travel photography.
DSLR (Digital Single-Lens Reflex) Cameras
DSLR cameras are favored by many enthusiasts and professional photographers due to their versatility and superior image quality. They use a mirror mechanism to reflect light from the lens to an optical viewfinder, providing a real-time preview of the scene. DSLRs offer interchangeable lenses, extensive manual controls, and a wide range of accessories. They excel in various photography genres, from portrait and landscape to sports and wildlife photography.
Mirrorless Cameras
Mirrorless cameras are similar to DSLRs but lack the mirror mechanism, resulting in a more compact and lightweight design. They use electronic viewfinders or LCD screens for composition. Mirrorless cameras provide high image quality, interchangeable lenses, and advanced features, making them a popular choice for both amateur and professional photographers. Their compact size and versatility make them ideal for travel and street photography.
Smartphone Cameras
Smartphone cameras have revolutionized photography by making it accessible to virtually everyone. Modern smartphones come equipped with high-resolution sensors, advanced computational photography features, and multiple lenses for various shooting scenarios. While they may not match the quality and flexibility of dedicated cameras, smartphones are incredibly convenient for spontaneous shots and everyday use. They are also integrated with social media platforms, making sharing your photos effortless.
Action Cameras
Action cameras are designed for capturing high-energy, fast-paced activities such as sports, adventure, and underwater photography. They are compact, rugged, and often waterproof, with wide-angle lenses that capture expansive scenes. Action cameras, like the popular GoPro, are equipped with features such as image stabilization and high frame rates, allowing for smooth video recording and sharp stills in extreme conditions.
Instant Cameras
Instant cameras provide a nostalgic and tangible photography experience by producing physical prints immediately after taking a picture. These cameras, popularized by brands like Polaroid and Fujifilm Instax, are fun and easy to use, making them great for parties, events, and creative projects. While the image quality may not be as high as digital cameras, the instant gratification and unique charm of printed photos appeal to many photography enthusiasts.
Light Field Cameras
Light field cameras are a newer and more advanced type of camera that captures the direction and intensity of light rays in a scene. This technology allows for post-capture adjustments of focus, depth of field, and perspective. Light field cameras, such as those developed by Lytro, offer innovative possibilities for creative photography and storytelling. While still relatively niche, they represent an exciting frontier in photographic technology.
Understanding the different types of cameras and their unique features can help you make an informed decision about which one best suits your needs and preferences. Whether you’re looking for the simplicity of a point-and-shoot, the versatility of a DSLR, the portability of a mirrorless camera, the convenience of a smartphone, the durability of an action camera, the nostalgia of an instant camera, or the innovation of a light field camera, there’s a perfect option out there for you. Embrace the diversity of camera technology and find the one that will inspire and support your photographic journey.

Types of Photography
Exploring Different Photography Styles
Photography encompasses a vast array of styles and genres, each with its unique techniques, challenges, and rewards. Here’s an exploration of some of the most popular photography styles to help you find your niche or broaden your photographic skills:
Portrait Photography
Portrait photography focuses on capturing the personality, mood, and essence of an individual or group. This style often emphasizes the subject’s face and expressions, utilizing lighting, backgrounds, and poses to enhance the overall image. Portrait photography can range from formal studio sessions to candid shots, making it a versatile genre that allows photographers to connect deeply with their subjects.
Landscape Photography
Landscape photography captures the beauty of nature and the great outdoors. This style typically involves photographing vast, expansive scenes such as mountains, forests, beaches, and deserts. Landscape photographers often focus on composition, lighting, and timing to create stunning images that convey the majesty and tranquility of the natural world. This genre requires patience and a keen eye for detail, as weather and light conditions can significantly impact the final image.
People and Street Photography
People and street photography documents everyday life and human interactions in public spaces. This style aims to capture the essence of a moment, often portraying spontaneous and candid scenes. Street photographers must be observant and quick, as the best shots often occur unexpectedly. This genre tells compelling stories through images, reflecting the diversity and vibrancy of urban environments.
Wildlife (Animals and Birds) Photography
Wildlife photography focuses on capturing animals and birds in their natural habitats. This style requires patience, persistence, and sometimes, significant travel. Wildlife photographers often use telephoto lenses to get close to their subjects without disturbing them. Understanding animal behavior is crucial for anticipating actions and capturing unique, dramatic moments. This genre offers a thrilling and rewarding way to connect with nature.
Tabletop and Product Photography
Tabletop and product photography involves photographing small objects, often for commercial purposes. This style requires meticulous attention to detail, lighting, and composition to showcase products attractively and accurately. Tabletop photography can include food, jewelry, electronics, and more. It’s essential for e-commerce, advertising, and catalog work, where high-quality images can influence consumer decisions.
Macro Photography
Macro photography involves capturing extreme close-ups of small subjects, revealing details that are often invisible to the naked eye. This style is popular for photographing insects, flowers, textures, and other minute details. Macro photography requires specialized equipment, such as macro lenses, and a deep understanding of focus and depth of field. This genre opens up a fascinating world of intricate beauty and complexity.
Architectural Photography
Architectural photography focuses on capturing buildings and structures, both exterior and interior. This style emphasizes the design, form, and aesthetics of architectural works. Photographers in this genre often use wide-angle lenses and consider lighting, angles, and perspectives to highlight the beauty and functionality of the built environment. Architectural photography can be used for real estate, construction, and artistic purposes.
Event Photography
Event photography captures the essence and highlights of various events, such as weddings, concerts, corporate functions, and parties. This style requires adaptability, quick thinking, and the ability to work in diverse lighting conditions. Event photographers must be adept at candid and posed shots, ensuring they document key moments and the overall atmosphere. This genre is crucial for preserving memories and providing visual records of significant occasions.
Exploring different photography styles allows you to discover your interests and strengths while expanding your skills. Whether you’re drawn to the intimate connection of portrait photography, the grandeur of landscapes, the spontaneity of street scenes, the thrill of wildlife, the precision of product shots, the detail of macro photography, the artistry of architectural photography, or the excitement of event photography, there’s a world of possibilities to explore. Each style offers unique opportunities for creative expression and storytelling, enriching your photographic journey.

Monetizing Your Photography
Making Money with Photography
Turning your passion for photography into a source of income can be incredibly rewarding. There are numerous ways to monetize your photography, from freelancing to selling your work online. Here are some effective methods to make money with your photography:
Freelance Photography Gigs
Freelance photography offers the flexibility to work on various projects and build a diverse portfolio. You can specialize in different genres such as weddings, events, portraits, real estate, and commercial photography. Networking, creating a professional website, and leveraging social media can help you attract clients. Offering high-quality services and maintaining strong client relationships are key to success in freelance photography.
Selling Prints and Photo Books
Selling physical prints of your photographs is a classic way to earn money. You can offer prints in various sizes and formats, such as framed prints, canvases, and posters. Creating photo books that compile your best work or tell a visual story can also be appealing to customers. You can sell prints and photo books through your website, local galleries, art fairs, and online marketplaces.
Stock Photography
Stock photography involves licensing your images to be used by others in their projects, such as websites, advertisements, and publications. Uploading your photos to stock photography websites can generate passive income as users purchase licenses to use your images. The key to success in stock photography is producing high-quality, versatile images that meet market demand.
Photography Workshops and Courses
If you have expertise in photography, consider teaching others through workshops and courses. You can offer in-person workshops, online classes, or one-on-one mentoring sessions. Sharing your knowledge and skills can be both fulfilling and profitable. Platforms like Skillshare, Udemy, and Teachable can help you reach a wider audience and monetize your teaching efforts.
Blogging and Social Media
Starting a photography blog or building a strong social media presence can attract a dedicated audience and open up monetization opportunities. You can earn money through affiliate marketing, sponsored posts, and advertising. Sharing your photography tips, tutorials, and behind-the-scenes content can engage your audience and establish you as an authority in the field.
Websites to Earn Money from Photography
Several websites provide platforms to sell your photographs and earn money. Here are some of the most popular options:
Shutterstock
Shutterstock is one of the largest stock photography platforms, offering a vast library of images to customers worldwide. Photographers can earn royalties every time their photos are downloaded. Shutterstock provides exposure to a broad audience, making it an excellent platform for stock photographers.
Adobe Stock
Adobe Stock integrates seamlessly with Adobe Creative Cloud applications, making it a popular choice for designers and creatives. Photographers can upload their images and earn royalties when their photos are purchased. Adobe Stock values high-quality, creative content, making it ideal for photographers with a unique style.
Alamy
Alamy offers a generous royalty structure and accepts a wide range of photographic styles. It provides access to a global market, allowing photographers to earn money from their images used in various projects. Alamy is known for its fair pricing and supportive community of contributors.
Getty Images
Getty Images is a leading stock photography agency known for its high standards and premium content. While it can be competitive to get accepted, contributing to Getty Images can result in significant exposure and earnings. Getty Images caters to a professional market, making it suitable for photographers with high-quality and unique images.
Etsy
Etsy is a popular marketplace for handmade and vintage items, including photography prints. Photographers can create their own shops to sell prints, photo books, and other photography-related products. Etsy’s audience appreciates creativity and uniqueness, providing a good platform for artistic photographers.
SmugMug
SmugMug allows photographers to create custom online galleries and sell their prints directly to customers. It offers various pricing plans and customization options, making it suitable for photographers who want to maintain control over their sales and branding. SmugMug also provides tools for marketing and client management.
Patreon
Patreon is a platform that allows creators to earn recurring income from their supporters. Photographers can offer exclusive content, tutorials, behind-the-scenes access, and more to their patrons. Patreon provides a steady income stream and fosters a close-knit community of supporters.
Monetizing your photography can be a fulfilling way to turn your passion into a profitable venture. Whether you choose to freelance, sell prints, license your images, teach others, or leverage online platforms, there are numerous opportunities to earn money from your photography. Explore different avenues, find what works best for you, and enjoy the journey of making money doing what you love.

The Digital Darkroom
Basics of Photo Editing
Photo editing, also known as post-processing, is an essential skill for photographers. It involves enhancing and refining images to achieve the desired look and feel. The digital darkroom, equipped with various photo editing software, allows photographers to correct imperfections, adjust lighting and colors, and add creative touches to their work. Here’s an introduction to the basics of photo editing and some common techniques:
Introduction to Photo Editing
Photo editing is the process of manipulating and improving images using software tools. It can range from simple adjustments to complex retouching and compositing. Editing helps photographers bring out the best in their photos, ensuring they meet artistic and technical standards. Understanding the fundamentals of photo editing is crucial for achieving professional-quality results.
Common Editing Techniques
- Cropping
- Purpose: Cropping removes unwanted parts of an image, improves composition, and focuses attention on the subject.
- Technique: Use the crop tool to trim the edges of the photo. Maintain the aspect ratio to avoid distortion, and experiment with different compositions to enhance the visual impact.
- Color Correction
- Purpose: Adjusting colors ensures accurate representation and enhances the overall look of the image.
- Technique: Use tools like white balance, hue, saturation, and vibrance adjustments to correct color casts and enhance the colors. Aim for natural and pleasing tones.
- Exposure Adjustment
- Purpose: Correcting exposure ensures that the photo is neither too dark (underexposed) nor too bright (overexposed).
- Technique: Adjust brightness, contrast, highlights, shadows, and exposure sliders to balance the light in the image. Use the histogram as a guide to achieving proper exposure.
- Retouching
- Purpose: Retouching removes imperfections and enhances the subject’s appearance.
- Technique: Use tools like the healing brush, clone stamp, and spot removal to eliminate blemishes, dust spots, and distractions. For portraits, gentle retouching can smooth skin and enhance features without making the subject look unnatural.
Popular Photo Editing Software
Several photo editing software options cater to different skill levels and needs. Here are some of the most popular tools used by photographers:
Adobe Photoshop
Adobe Photoshop is the industry standard for photo editing and manipulation. It offers a comprehensive set of tools for advanced editing, retouching, and compositing. Photoshop is highly versatile, making it suitable for photographers, graphic designers, and digital artists. Its robust features include layers, masks, filters, and an extensive range of adjustment tools.
Adobe Lightroom
Adobe Lightroom is designed specifically for photographers. It provides powerful editing capabilities and a streamlined workflow for organizing and processing large volumes of images. Lightroom’s non-destructive editing allows you to make adjustments without altering the original file. It’s ideal for managing and editing photos, from basic adjustments to advanced color grading.
GIMP
GIMP (GNU Image Manipulation Program) is a free, open-source photo editing software. It offers many features similar to Photoshop, including layers, masks, and a wide range of editing tools. GIMP is a great option for those seeking a cost-effective alternative to professional-grade software, with a strong community and extensive documentation supporting its use.
Capture One
Capture One is a professional-grade photo editing software known for its exceptional color grading and tethering capabilities. It offers advanced tools for color correction, exposure adjustment, and image sharpening. Capture One is popular among studio and commercial photographers for its powerful editing features and superior raw processing.
Snapseed
Snapseed is a free, mobile-friendly photo editing app developed by Google. It provides a user-friendly interface and a range of powerful editing tools, including selective adjustments, filters, and retouching options. Snapseed is ideal for photographers who want to edit photos on the go, offering professional-quality results on mobile devices.
The digital darkroom is where the magic of photo editing happens. Understanding the basics of photo editing and mastering common techniques can significantly enhance the quality of your images. Whether you use professional software like Adobe Photoshop and Lightroom, or free alternatives like GIMP and Snapseed, the key is to experiment, practice, and develop your unique editing style. With the right tools and skills, you can transform your photographs into stunning visual masterpieces.

Storing Your Photographs
Photo Storage Solutions
As a photographer, managing and storing your digital images efficiently is crucial to ensure they remain safe, organized, and easily accessible. Here are some reliable photo storage solutions that cater to different needs and preferences:
Cloud Storage Options
Cloud storage has become increasingly popular due to its convenience, scalability, and accessibility. Here are some leading cloud storage options for photographers:
- Google Photos
- Features: Google Photos offers unlimited storage for high-quality images (compressed) and a paid option for original quality storage. It provides automatic backup, powerful search capabilities, and easy sharing options. Google Photos also includes basic editing tools and allows you to create albums and photo books.
- Pros: User-friendly, integrates well with other Google services, and offers generous free storage.
- Cons: High-quality storage compresses images, and free storage is limited for original quality photos.
- Dropbox
- Features: Dropbox is known for its simplicity and reliability. It offers automatic backup, easy file sharing, and collaboration features. Dropbox integrates with various third-party applications, making it versatile for different workflows.
- Pros: Easy to use, robust syncing capabilities, and extensive integration options.
- Cons: Limited free storage (2 GB), with additional storage available through paid plans.
- iCloud
- Features: iCloud is ideal for Apple users, offering seamless integration with macOS and iOS devices. It provides automatic backup, easy sharing, and access across all Apple devices. iCloud Photo Library ensures your photos are organized and accessible from anywhere.
- Pros: Excellent integration with Apple devices, automatic backup, and synchronization.
- Cons: Limited free storage (5 GB), and additional storage requires a subscription.
External Hard Drives and SSDs
For those who prefer physical storage solutions, external hard drives and solid-state drives (SSDs) offer reliable and secure options:
- External Hard Drives
- Features: External hard drives are cost-effective and provide large storage capacities, making them suitable for backing up extensive photo libraries. They connect via USB or Thunderbolt and are compatible with most computers.
- Pros: Affordable, high storage capacity, and easy to use.
- Cons: Susceptible to physical damage and slower transfer speeds compared to SSDs.
- Solid-State Drives (SSDs)
- Features: SSDs offer faster data transfer speeds, greater durability, and better performance compared to traditional hard drives. They are ideal for photographers who need quick access to their images and want a portable, robust storage solution.
- Pros: Fast, durable, and reliable.
- Cons: More expensive than external hard drives, with relatively lower storage capacities at higher price points.
Photo Organizing Software
Keeping your photos organized is essential for efficient workflow and quick access to your images. Photo organizing software helps you manage, sort, and categorize your photo library:
- Adobe Lightroom
- Features: Adobe Lightroom offers powerful photo management tools, including tagging, rating, and keywording. It allows you to create collections, smart collections, and albums to organize your photos. Lightroom also includes advanced search and filter options to find specific images quickly.
- Pros: Comprehensive organizing features, integrates with editing tools, and supports large libraries.
- Cons: Subscription-based, can be complex for beginners.
- Adobe Bridge
- Features: Adobe Bridge is a digital asset management application that provides robust organizing features. It supports tagging, keywording, rating, and metadata editing. Bridge integrates seamlessly with other Adobe Creative Cloud applications.
- Pros: Free with Adobe Creative Cloud, powerful management tools, and excellent integration.
- Cons: May be overkill for casual photographers, requires familiarity with Adobe’s ecosystem.
- Apple Photos
- Features: Apple Photos is a built-in application for macOS and iOS devices, offering intuitive organizing features. It supports albums, smart albums, and facial recognition. Apple Photos also provides basic editing tools and synchronization across Apple devices.
- Pros: User-friendly, integrates with iCloud, and easy to use for Apple users.
- Cons: Limited to Apple devices, with fewer advanced features compared to Lightroom.
Choosing the right photo storage solution depends on your specific needs, preferences, and budget. Cloud storage options like Google Photos, Dropbox, and iCloud offer convenience and accessibility, while external hard drives and SSDs provide secure, physical storage. Photo organizing software such as Adobe Lightroom, Adobe Bridge, and Apple Photos can help you manage and categorize your images effectively. By selecting the appropriate storage solutions, you can ensure your photos are safe, organized, and readily available for future use.

Photography Terminology
Understanding key photography terms is essential for mastering the technical aspects of photography. Here are some fundamental concepts that every photographer should know:
Key Photography Terms
Aperture
- Definition: Aperture refers to the opening in a camera lens through which light passes to enter the camera body. It is measured in f-stops (e.g., f/1.8, f/2.8, f/5.6).
- Impact: The aperture affects the amount of light that reaches the camera sensor and controls the depth of field. A wider aperture (smaller f-stop number) allows more light in and creates a shallow depth of field, resulting in a blurred background. A narrower aperture (larger f-stop number) lets in less light and increases the depth of field, keeping more of the scene in focus.
Shutter Speed
- Definition: Shutter speed refers to the amount of time the camera’s shutter is open, exposing the sensor to light. It is measured in seconds or fractions of a second (e.g., 1/1000s, 1/250s, 1/30s).
- Impact: Shutter speed affects the exposure and motion blur in an image. A fast shutter speed (short duration) freezes motion, while a slow shutter speed (long duration) can create motion blur. Adjusting the shutter speed allows photographers to capture sharp, clear images or convey movement creatively.
ISO
- Definition: ISO measures the sensitivity of the camera’s sensor to light. It is represented by numbers (e.g., ISO 100, ISO 400, ISO 1600).
- Impact: A lower ISO value (e.g., ISO 100) results in less sensitivity to light and produces cleaner images with less noise. A higher ISO value (e.g., ISO 1600) increases sensitivity, allowing for better performance in low-light conditions but can introduce more noise or graininess in the image. Balancing ISO with aperture and shutter speed is crucial for proper exposure.
Depth of Field
- Definition: Depth of field (DOF) refers to the distance between the nearest and farthest objects in a photo that appear acceptably sharp. It is influenced by the aperture, focal length, and distance from the subject.
- Impact: A shallow depth of field (achieved with a wide aperture) isolates the subject by blurring the background and foreground, making the subject stand out. A deep depth of field (achieved with a narrow aperture) keeps more of the scene in focus, which is ideal for landscapes and architectural photography.
White Balance
- Definition: White balance adjusts the color temperature of an image to ensure that whites appear white and other colors are rendered accurately. Different light sources (e.g., sunlight, tungsten, fluorescent) have varying color temperatures.
- Impact: Proper white balance ensures that the colors in a photo look natural and consistent. Incorrect white balance can result in color casts, making an image appear too warm (yellow/orange) or too cool (blue). Most cameras offer preset white balance settings (e.g., daylight, cloudy, tungsten) and custom white balance adjustments.
Exposure
- Definition: Exposure refers to the amount of light that reaches the camera sensor, determining how bright or dark an image appears. It is controlled by the combination of aperture, shutter speed, and ISO.
- Impact: Proper exposure ensures that the image captures the right amount of light, preserving details in both highlights and shadows. Overexposure results in too much light, causing washed-out highlights, while underexposure results in too little light, causing loss of detail in shadows. The exposure triangle (aperture, shutter speed, ISO) helps photographers achieve balanced exposure.
Focal Length
- Definition: Focal length is the distance between the camera lens and the image sensor when the subject is in focus. It is measured in millimeters (mm) and determines the field of view and magnification of the image.
- Impact: A shorter focal length (e.g., 18mm) provides a wider field of view, making it suitable for landscapes and wide-angle shots. A longer focal length (e.g., 200mm) provides a narrower field of view and greater magnification, ideal for portraits and telephoto shots. The choice of focal length influences the composition and perspective of the photograph.
Mastering key photography terms such as aperture, shutter speed, ISO, depth of field, white balance, exposure, and focal length is fundamental to becoming a skilled photographer. Understanding these concepts allows you to make informed decisions about camera settings, resulting in better control over the final image. Whether you’re capturing a stunning landscape, a dynamic action shot, or a beautifully composed portrait, knowledge of these terms will enhance your photographic abilities and help you achieve your creative vision.

Photography Equipment
Having the right photography equipment can significantly impact your ability to capture high-quality images and achieve your creative vision. Here’s a guide to essential photography gear and its importance:
Essential Photography Gear
Lenses
Lenses are a fundamental component of any camera system, each serving different purposes and offering unique perspectives:
- Wide-Angle Lenses
- Description: Lenses with a focal length shorter than 35mm are considered wide-angle. They capture a broader field of view, making them ideal for landscapes, architecture, and interior shots.
- Advantages: Wide depth of field, excellent for fitting more into the frame, and capturing expansive scenes.
- Telephoto Lenses
- Description: Telephoto lenses have a focal length greater than 70mm, allowing you to zoom in on distant subjects without moving closer. They are commonly used for wildlife, sports, and portrait photography.
- Advantages: Allows for close-up shots from a distance, compresses perspective, and provides a shallow depth of field.
- Prime Lenses
- Description: Prime lenses have a fixed focal length (e.g., 50mm, 85mm) and offer superior optical quality and low light performance. They are often used for portraits, street photography, and low-light conditions.
- Advantages: Typically sharper images, wider apertures, and often lighter and more compact than zoom lenses.
- Zoom Lenses
- Description: Zoom lenses have variable focal lengths (e.g., 24-70mm, 70-200mm) and offer flexibility by allowing you to adjust the zoom range. They are versatile for various photography scenarios.
- Advantages: Provides a range of focal lengths in one lens, reducing the need to switch lenses frequently.
Tripods and Monopods
- Tripods
- Description: Tripods are three-legged stands that provide stability for your camera, reducing camera shake and allowing for long-exposure shots and precise composition.
- Advantages: Essential for low-light photography, landscape shots, and long-exposure photography. Helps in achieving sharp, clear images.
- Monopods
- Description: Monopods are single-legged stands that provide some stability while allowing for greater mobility than tripods. They are useful for dynamic shooting situations where stability is needed but space is limited.
- Advantages: Easier to maneuver than tripods, provides extra support, and can be quickly set up or taken down.
Camera Bags and Cases
- Camera Bags
- Description: Camera bags come in various styles, including backpacks, shoulder bags, and sling bags. They are designed to carry and protect your camera gear, lenses, and accessories.
- Advantages: Protects equipment from physical damage and environmental elements, provides organizational compartments for easy access to gear.
- Camera Cases
- Description: Camera cases are protective covers or pouches for individual cameras or lenses. They offer additional protection and can be used for storing or carrying gear separately.
- Advantages: Provides extra protection against dust, moisture, and accidental impacts. Ideal for traveling or storing gear.
Memory Cards
- Description: Memory cards are removable storage devices used to store digital photos and videos. They come in various types, including SD (Secure Digital), microSD, and CF (CompactFlash).
- Advantages: Essential for storing images and videos; higher-capacity cards can store more files, and faster cards improve write speeds, which is crucial for high-resolution or burst shooting.
External Flashes
- Description: External flashes are off-camera lighting devices that provide additional light for photography. They can be mounted on the camera or used remotely.
- Advantages: Improves lighting in low-light conditions, allows for creative lighting effects, and can be adjusted to control light intensity and direction. Useful for portrait, event, and macro photography.
Equipping yourself with essential photography gear—such as lenses, tripods, camera bags, memory cards, and external flashes—enhances your ability to capture high-quality images and adapt to various shooting scenarios. Each piece of equipment plays a crucial role in ensuring that your camera is well-prepared for different photographic challenges. By understanding the purpose and advantages of each item, you can make informed decisions about the gear that best supports your photography goals.
Lighting in Photography
Lighting is a fundamental aspect of photography that significantly impacts the mood, tone, and quality of your images. Understanding how to use both natural and artificial light, along with various light modifiers, can enhance your ability to create stunning photographs.
Understanding Light and Light Modifiers
Natural Light vs. Artificial Light
- Natural Light
- Definition: Natural light comes from the sun and varies throughout the day and across different weather conditions. It includes direct sunlight, shade, and diffused light through clouds.
- Characteristics: Natural light can be soft or harsh depending on the time of day, weather conditions, and the position of the sun. It can create different moods and effects in your photographs.
- Artificial Light
- Definition: Artificial light is created using lighting equipment such as flashes, studio lights, and LED panels. It is used to simulate or complement natural light in controlled environments.
- Characteristics: Artificial light provides flexibility and control over lighting conditions. It can be adjusted for intensity, color temperature, and direction to achieve desired effects.
Reflectors and Diffusers
- Reflectors
- Description: Reflectors bounce light back onto the subject, filling in shadows and enhancing the overall illumination. They come in various shapes and sizes, with surfaces that reflect light in different ways (e.g., silver, gold, white).
- Advantages: Help to brighten up shadows and reduce harsh lighting. They are useful for portrait and product photography to achieve even lighting.
- Diffusers
- Description: Diffusers soften and scatter light, reducing harsh shadows and creating a more even, gentle illumination. They can be made of materials like fabric or plastic and are often used in conjunction with light sources.
- Advantages: Create a softer, more flattering light, reducing contrast and harshness. Ideal for portrait and product photography to achieve a smooth, even look.
Softboxes and Umbrellas
- Softboxes
- Description: Softboxes are lighting modifiers that enclose the light source with a diffusing material, creating a soft, even light. They are often used in studio settings for controlled lighting.
- Advantages: Provide a diffused, soft light that reduces shadows and highlights, making them ideal for portrait and product photography. They allow for precise control over lighting direction and intensity.
- Umbrellas
- Description: Umbrellas are used to diffuse or reflect light. There are two main types: shoot-through (diffuse light) and reflective (bounce light). They are typically used with external flashes or studio lights.
- Advantages: Umbrellas are versatile and portable. They offer a quick and effective way to diffuse light and create a softer illumination. Reflective umbrellas can add a catchlight to the subject’s eyes.
Using Natural Light
Golden Hour and Blue Hour
- Golden Hour
- Definition: The golden hour is the period shortly after sunrise and before sunset when the light is warm, soft, and diffused. It is known for its flattering quality and long shadows.
- Advantages: Creates a golden, warm tone in photographs, enhancing the mood and texture. Ideal for landscape, portrait, and architectural photography.
- Blue Hour
- Definition: The blue hour occurs just before sunrise and after sunset when the sky takes on a deep blue hue. It provides a cool, serene light that contrasts with the warmer tones of golden hour.
- Advantages: Offers a unique, moody atmosphere with rich blues and soft light. Suitable for cityscapes, twilight shots, and capturing the transition between day and night.
Diffusing Sunlight with Natural Reflectors
- Using Natural Reflectors
- Description: Natural reflectors, such as walls, buildings, or even the ground, can bounce sunlight onto your subject, softening shadows and creating more even lighting.
- Techniques:
- Walls and Buildings: Utilize light-colored or reflective surfaces to bounce light back onto your subject. This can help fill in shadows and create a more balanced exposure.
- Ground and Water: Surfaces like water or sand can reflect sunlight and add a natural glow to your subject, enhancing the overall lighting.
Mastering lighting in photography involves understanding the nuances of natural and artificial light, as well as utilizing light modifiers like reflectors, diffusers, softboxes, and umbrellas. By experimenting with different lighting conditions, such as golden hour and blue hour, and leveraging natural reflectors, you can enhance your photographic results and achieve the desired mood and effect. Whether you’re working with natural light or using artificial sources, effective lighting is key to capturing compelling and well-exposed images.
Composition in Photography
Composition is one of the most critical elements of photography. It involves arranging visual elements within the frame to create a harmonious, engaging, and aesthetically pleasing image. Understanding composition helps photographers guide the viewer’s eye, convey messages, and enhance the overall impact of their photos.
What is Composition?
Definition and Importance of Composition in Photography
- Definition: Composition in photography refers to the way elements are arranged within the frame of a photograph. It involves selecting and positioning subjects, backgrounds, and other visual elements to create a coherent and visually appealing image.
- Importance: Good composition is crucial because it:
- Guides the Viewer’s Eye: Effective composition directs the viewer’s attention to the main subject or area of interest in the photograph.
- Creates Balance: A well-composed photo achieves visual balance, ensuring that no part of the image overwhelms or distracts from the main subject.
- Enhances Storytelling: Composition can convey mood, emphasize important elements, and tell a story through the arrangement of visual elements.
- Improves Aesthetics: Applying composition techniques helps create more engaging, visually pleasing photographs that capture and hold the viewer’s attention.
Typical Rules of Composition
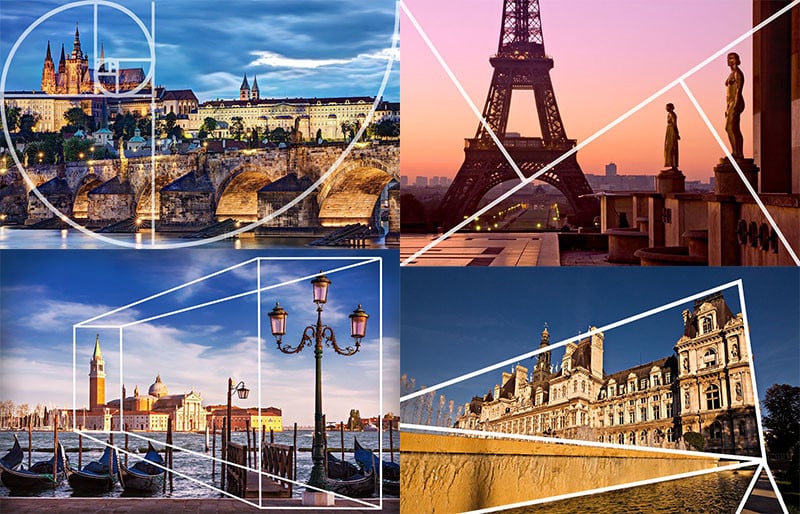
Rule of Thirds
- Definition: The rule of thirds divides the image into nine equal parts using two equally spaced horizontal lines and two equally spaced vertical lines. Placing key elements along these lines or at their intersections creates a more balanced and dynamic composition.
- Application: Align your subject or focal points with the grid lines or intersections to create a visually interesting image. For example, position the horizon along the top or bottom horizontal line rather than the center.
Leading Lines
- Definition: Leading lines are compositional elements that guide the viewer’s eye toward the main subject or focal point of the image. These lines can be natural or man-made, such as roads, fences, or rivers.
- Application: Use leading lines to draw the viewer’s attention to the main subject or to create a sense of depth and perspective. Position these lines so they lead the viewer’s eye through the photograph in a deliberate manner.
Framing
- Definition: Framing involves using elements within the scene to create a ‘frame’ around the main subject. This can include natural elements like trees or windows, or man-made structures.
- Application: Incorporate elements that naturally surround or enclose your subject to emphasize it and draw the viewer’s attention. This technique helps create a sense of depth and focus.
Symmetry and Patterns
- Definition: Symmetry and patterns involve arranging elements in a photograph to create a balanced, orderly composition. Symmetry refers to mirroring elements on either side of a central axis, while patterns involve repeating visual elements.
- Application: Capture symmetrical scenes to create a sense of harmony and balance. Use patterns to add visual interest and texture to your composition. Both techniques can enhance the structure and appeal of your photographs.
Depth and Layering
- Definition: Depth and layering involve creating a sense of three-dimensional space within a photograph. This is achieved by including foreground, middle ground, and background elements, which add layers and depth to the image.
- Application: Include elements in the foreground, middle ground, and background to create a more immersive and three-dimensional effect. This technique adds depth and helps to separate different layers within the photograph, making the composition more engaging.
Mastering composition is essential for creating compelling and visually appealing photographs. By applying rules such as the rule of thirds, leading lines, framing, symmetry, and patterns, as well as incorporating depth and layering, you can enhance the effectiveness of your images. These compositional techniques help guide the viewer’s eye, create balance, and improve the overall aesthetic quality of your photographs. Experiment with these techniques to develop your unique photographic style and capture images that stand out.

Reducing Shake in Photography
Minimizing camera shake is crucial for achieving sharp, clear images, particularly in low-light conditions or when using long focal lengths. Camera shake occurs when there is unintended movement of the camera during exposure, leading to blurry or unfocused images. Here are key techniques to reduce shake and improve the clarity of your photographs:
Techniques for Minimal Shake
Proper Stance and Grip
- Stance:
- Feet Position: Stand with your feet shoulder-width apart to provide a stable base. This stance helps maintain balance and minimizes movement.
- Knees Slightly Bent: Keep your knees slightly bent to lower your center of gravity and enhance stability.
- Elbows Tucked: Tuck your elbows close to your body to provide additional support and reduce the chance of camera shake.
- Grip:
- Hold the Camera Firmly: Use a firm grip on the camera body with both hands. One hand should support the camera’s body, while the other hand should hold the lens or control the camera settings.
- Use Your Body for Support: When shooting, use your body as a support by leaning against a wall, railing, or other stable surface if possible.
- Breathing Technique: Practice steady breathing to avoid exhaling or inhaling sharply during the shot, which can cause camera movement.
Using Tripods and Monopods
- Tripods:
- Description: A tripod is a three-legged support that stabilizes the camera and prevents movement during exposure.
- Benefits: Provides maximum stability and eliminates shake, especially in low-light conditions or when using long exposures. It is ideal for landscape, architecture, and macro photography.
- Usage Tips: Ensure the tripod is on a stable surface, and use the tripod’s weight hook to add stability if needed. Avoid touching the camera while taking the shot; use a remote shutter release or the camera’s timer to minimize vibration.
- Monopods:
- Description: A monopod is a single-legged support that provides partial stabilization while allowing for more mobility than a tripod.
- Benefits: Offers improved stability over hand-held shooting while being more portable and quicker to set up. It is useful for sports, wildlife, and event photography where movement is required.
- Usage Tips: Ensure the monopod is firmly planted and adjust the height to maintain stability. Use the monopod to support the camera’s weight and reduce camera shake.
Camera Settings for Stabilization
- Shutter Speed:
- Technique: Use a faster shutter speed to reduce the risk of shake. As a general rule, your shutter speed should be at least the reciprocal of your focal length (e.g., for a 50mm lens, use a shutter speed of 1/50 seconds or faster).
- Application: For low-light conditions or longer focal lengths, increase the shutter speed to freeze motion and reduce blur.
- Image Stabilization (IS):
- Description: Image stabilization (also known as vibration reduction or optical image stabilization) is a feature available in some cameras and lenses that compensates for camera shake.
- Benefits: Helps reduce blurriness caused by small movements and allows for clearer shots at slower shutter speeds. Enable IS in your camera or lens settings when shooting hand-held or using long focal lengths.
- Camera Modes:
- Use of Stabilization Modes: Some cameras and lenses offer different stabilization modes (e.g., IS on/off, active/standard mode). Select the appropriate mode based on your shooting conditions and the level of stabilization needed.
- Settings Adjustment: In situations where stabilization may not be effective, such as high-speed action shots, consider using faster shutter speeds and other stabilization techniques.
Reducing camera shake is essential for capturing sharp, high-quality images. By adopting proper stances and grips, using tripods and monopods, and adjusting camera settings for stabilization, you can significantly minimize shake and improve your photographic results. Implement these techniques to enhance the clarity and professionalism of your images, whether you’re shooting in low-light conditions or using long focal lengths.

Camera Modes
Understanding the different camera modes is key to controlling how your photos turn out. Each mode offers different levels of control over exposure settings, allowing you to tailor your shots based on the conditions and your creative intent. Here’s a breakdown of the main camera modes and how to use them effectively:
Understanding Camera Modes
Automatic Mode
- Definition:
- In Automatic mode, the camera takes full control of exposure settings, including aperture, shutter speed, and ISO. The photographer simply needs to point and shoot, and the camera makes all the decisions to achieve a well-exposed image.
- Advantages:
- Ease of Use: Ideal for beginners or situations where quick shots are needed without adjusting settings manually.
- Convenience: Simplifies the shooting process by automatically adjusting settings based on the scene and lighting conditions.
- Disadvantages:
- Limited Creative Control: Offers less control over how your image is exposed, which may not be suitable for more advanced techniques or creative effects.
- Inconsistent Results: Automatic settings might not always produce the desired result, especially in challenging lighting conditions or complex scenes.
Aperture Priority Mode
- Definition:
- Aperture Priority mode (often denoted as “A” or “Av” on the camera dial) allows you to set the aperture (f-stop), while the camera automatically adjusts the shutter speed to achieve proper exposure.
- Advantages:
- Depth of Field Control: Enables you to control the depth of field (the area of the image that is in focus). A lower f-number (e.g., f/2.8) results in a shallow depth of field with a blurred background, while a higher f-number (e.g., f/16) results in a greater depth of field with more of the scene in focus.
- Creative Flexibility: Useful for portrait photography to achieve a blurred background or landscape photography to keep the entire scene in sharp focus.
- Disadvantages:
- Shutter Speed Variations: The camera’s automatic adjustment of shutter speed might not always be optimal, especially in low-light conditions, which could lead to motion blur or noise.
Shutter Priority Mode
- Definition:
- Shutter Priority mode (often denoted as “S” or “Tv” on the camera dial) allows you to set the shutter speed while the camera automatically adjusts the aperture to maintain proper exposure.
- Advantages:
- Motion Control: Ideal for capturing fast-moving subjects or freezing motion with a fast shutter speed, or for creating motion blur with a slower shutter speed.
- Creative Effects: Useful for long-exposure shots, such as capturing light trails or smoothing out water in landscape photography.
- Disadvantages:
- Depth of Field Impact: Since the aperture is automatically adjusted, you might not have control over the depth of field, which can affect the overall composition of the image.
Manual Mode
- Definition:
- Manual mode (denoted as “M” on the camera dial) gives you full control over both the aperture and shutter speed settings. You are responsible for adjusting both settings to achieve the desired exposure.
- Advantages:
- Complete Creative Control: Allows you to fine-tune exposure settings to achieve specific effects or handle challenging lighting conditions precisely.
- Exposure Compensation: Gives you the ability to override automatic settings and make adjustments based on your creative vision or specific requirements of the scene.
- Disadvantages:
- Complexity: Requires a deeper understanding of exposure settings and their interactions. It may be more challenging for beginners or those in fast-paced shooting situations.
- Risk of Improper Exposure: If settings are not adjusted correctly, it can lead to underexposed or overexposed images.
Understanding and effectively using camera modes allows you to tailor your photography approach to different situations and creative needs. Automatic mode offers simplicity, while Aperture Priority and Shutter Priority modes provide control over specific elements of exposure. Manual mode offers complete control but requires more technical knowledge. By mastering these modes, you can enhance your ability to capture well-exposed, impactful images in a variety of scenarios.
Best Modes for Different Situations
Selecting the appropriate camera mode for different shooting scenarios is essential for achieving the best results. Each mode offers specific advantages tailored to various types of photography. Here’s a guide to choosing the best camera modes for common situations:
Portraits
Recommended Mode: Aperture Priority Mode
- Why:
- Depth of Field Control: Aperture Priority mode allows you to set a wide aperture (e.g., f/1.8 to f/4) for a shallow depth of field. This creates a pleasing background blur (bokeh) that isolates the subject and emphasizes the portrait.
- Focus on the Subject: With a wide aperture, the focus is on the subject while the background is softly blurred, making the subject stand out.
- Settings Tips:
- Aperture: Set a wide aperture (e.g., f/1.8 to f/4) for a shallow depth of field.
- Shutter Speed: The camera will automatically adjust the shutter speed to match the aperture setting, but ensure it is fast enough to avoid motion blur.
Action Shots
Recommended Mode: Shutter Priority Mode
- Why:
- Motion Control: Shutter Priority mode allows you to select a fast shutter speed to freeze fast-moving action and capture sharp images of dynamic scenes. Alternatively, a slower shutter speed can be used to convey motion blur for artistic effects.
- Settings Tips:
- Shutter Speed: Choose a fast shutter speed (e.g., 1/1000 seconds or faster) to freeze motion. Adjust based on the speed of the action.
- Aperture: The camera will adjust the aperture automatically, but be mindful of the depth of field if you require specific effects.
Low Light Conditions
Recommended Mode: Manual Mode or Aperture Priority Mode
- Why:
- Manual Mode: Offers full control over both aperture and shutter speed, allowing you to optimize settings for the available light. This is useful for low-light conditions where precise adjustments are necessary.
- Aperture Priority Mode: Allows you to use a wide aperture to maximize light intake while the camera adjusts the shutter speed. This is effective if you need some level of control over depth of field.
- Settings Tips:
- Aperture: Use a wide aperture (e.g., f/1.8 to f/4) to allow more light to enter the camera.
- Shutter Speed: In Manual mode, choose a slower shutter speed to capture more light, but be cautious of camera shake. In Aperture Priority mode, ensure the camera’s automatic shutter speed is adequate to avoid blur.
- ISO: Increase the ISO setting to make the sensor more sensitive to light, but be mindful of potential noise.
Landscape
Recommended Mode: Aperture Priority Mode
- Why:
- Depth of Field Control: Aperture Priority mode allows you to set a smaller aperture (e.g., f/8 to f/16) to achieve a greater depth of field, ensuring that both the foreground and background are in sharp focus, which is ideal for landscape photography.
- Settings Tips:
- Aperture: Set a smaller aperture (e.g., f/8 to f/16) to maximize depth of field.
- Shutter Speed: The camera will adjust the shutter speed automatically, but ensure it is fast enough to prevent camera shake, especially if you’re shooting hand-held.
Choosing the right camera mode for different situations enhances your ability to capture high-quality images. Aperture Priority mode is well-suited for portraits and landscapes due to its control over depth of field. Shutter Priority mode excels in action shots by allowing you to freeze motion or create motion blur. Manual mode provides full control for low-light conditions, giving you the flexibility to fine-tune settings as needed. Understanding these modes and their applications helps you adapt to various shooting scenarios and achieve the desired photographic results.
Mobile Photography
Mobile photography has evolved significantly, and modern smartphones offer impressive camera capabilities that rival traditional cameras. To make the most of your smartphone’s camera, understanding how to handle it properly and utilizing useful accessories can enhance your mobile photography experience. Here’s a guide to maximizing your smartphone camera and achieving stunning photos.
Maximizing Your Smartphone Camera
How to Hold the Phone for Stability
- Proper Grip:
- Hold with Both Hands: Use both hands to hold your smartphone for better stability. Place one hand on the bottom of the phone and the other around the sides to maintain a secure grip.
- Elbows In: Keep your elbows close to your body to create a more stable base and reduce camera shake.
- Stance:
- Feet Position: Stand with your feet shoulder-width apart to provide a stable stance.
- Knees Slightly Bent: Bend your knees slightly to lower your center of gravity and enhance stability.
- Leaning on Support: If possible, lean against a stable surface such as a wall or railing to reduce movement.
- Breathing Technique:
- Steady Breathing: Practice steady breathing to avoid sudden movements or jolts that can affect stability during the shot. Take a deep breath and release it slowly before pressing the shutter.
Useful Accessories
- Phone Tripod:
- Description: A compact tripod designed specifically for smartphones. It provides stability and allows for hands-free shooting.
- Benefits: Ideal for long exposures, low-light conditions, and selfies. It also helps prevent camera shake and ensures sharper images.
- External Lenses:
- Description: Clip-on or magnetic lenses that attach to your smartphone to provide different focal lengths and effects, such as wide-angle, macro, and fisheye.
- Benefits: Expands your creative options and enhances your smartphone’s versatility. Wide-angle lenses capture more of the scene, while macro lenses allow for close-up photography.
- Gimbal Stabilizer:
- Description: A handheld device that uses motors to stabilize your smartphone, reducing camera shake and providing smooth video footage.
- Benefits: Ideal for video recording and dynamic shots. It helps maintain steady footage and enhances the overall quality of your videos.
Mobile Photo Editing Apps
- Snapseed:
- Description: A powerful photo editing app developed by Google, offering a wide range of editing tools and filters.
- Features: Includes tools for adjusting brightness, contrast, color balance, sharpness, and applying creative filters.
- VSCO:
- Description: A popular app known for its high-quality filters and editing tools.
- Features: Provides a variety of presets and manual editing options, such as exposure, contrast, and saturation adjustments.
- Adobe Lightroom Mobile:
- Description: A mobile version of Adobe’s professional photo editing software, offering advanced editing tools and features.
- Features: Includes tools for adjusting exposure, color grading, and applying selective edits. Integrates with Adobe Creative Cloud for seamless desktop synchronization.
- Afterlight:
- Description: An intuitive app with a user-friendly interface, offering a range of editing tools and filters.
- Features: Provides tools for cropping, adjusting brightness, contrast, and saturation, as well as adding filters and textures.
- Prisma:
- Description: An app that uses artificial intelligence to transform photos into artworks with various artistic styles.
- Features: Applies unique art filters and styles to your photos, turning them into visually striking pieces.
Maximizing your smartphone camera involves understanding proper handling techniques, utilizing useful accessories, and employing powerful editing apps. By holding your phone steadily, using accessories like tripods and external lenses, and leveraging mobile photo editing apps, you can significantly enhance the quality of your mobile photography. Whether you’re capturing everyday moments or creating artistic shots, these tips will help you make the most of your smartphone’s camera capabilities and achieve impressive results.

Conclusion
Encouragement to Start Exploring Photography
Photography is more than just capturing images; it’s about expressing yourself, exploring the world, and connecting with others through the lens. Whether you’re drawn to portraits, landscapes, or the vibrant moments of daily life, photography offers endless opportunities for creativity and personal growth.
Recap of the Benefits and Joy of Photography
- Creative Expression: Photography allows you to share your unique perspective and creativity with the world. Each photo tells a story and captures moments that can be cherished forever.
- Capturing Memories: Photography helps preserve special moments and experiences, allowing you to revisit them and share them with others.
- Exploring Perspectives: Through photography, you can discover new ways of seeing the world and enhance your ability to observe and appreciate the beauty around you.
- Building Community: Engaging with photography connects you with a community of fellow enthusiasts, providing opportunities for collaboration, feedback, and shared experiences.
Resources for Further Learning
To continue your journey into photography, consider exploring the following resources:
- Online Photography Courses: Websites like Udemy, Coursera, and MasterClass offer a variety of photography courses that cater to different skill levels and interests.
- Photography Blogs and Forums: Engage with online communities such as Photography Life, Digital Photography School, and Reddit’s photography forums for tips, inspiration, and advice.
- Local Workshops and Meetups: Check out local photography workshops or meetups to learn from experienced photographers and connect with like-minded individuals.
Final Tips and Motivation to Practice and Experiment
- Practice Regularly: The more you practice, the better you’ll become. Experiment with different techniques, subjects, and settings to refine your skills and find your style.
- Stay Curious: Keep exploring new styles and genres of photography. Embrace challenges and use them as opportunities to grow and improve.
- Learn from Mistakes: Don’t be discouraged by mistakes. Use them as learning experiences to enhance your skills and understanding of photography.
As you embark on your photography journey, consider supporting the MEDA Foundation. Your contributions can make a significant impact on the lives of those in need, aligning with the spirit of giving and community that photography embodies.
Book Reference to Learn More
Books
“Understanding Exposure” by Bryan Peterson
- A comprehensive guide to mastering exposure settings and improving your photography skills.
“The Photographer’s Eye: Composition and Design for Better Digital Photos” by Michael Freeman
- Focuses on the principles of composition and design to enhance your photographic vision.
“Digital Photography Complete Course” by David Taylor
- A step-by-step guide covering all aspects of digital photography, from basic principles to advanced techniques.
“Light, Gesture, and Color” by Jay Maisel
- Offers insights into capturing compelling images by focusing on light, gesture, and color.
“The Art of Photography: An Approach to Personal Expression” by Bruce Barnbaum
- Explores the artistic side of photography, offering advice on developing a personal style and vision.
Online Resources
Photography Life
- Photography Life offers articles, tutorials, and reviews on various photography topics.
Digital Photography School
- Digital Photography School provides tips, tutorials, and inspiration for photographers of all levels.
Fstoppers
- Fstoppers features photography news, tutorials, and articles by professional photographers.
PetaPixel
- PetaPixel is a photography news and information website offering gear reviews, tips, and industry updates.
The Art of Photography YouTube Channel
- The Art of Photography provides video tutorials, reviews, and discussions on various photography topics.
Photography is a fulfilling and rewarding hobby that opens up a world of creativity and exploration. By applying the knowledge and tips shared in this article, you can enhance your skills and fully enjoy the art of capturing moments. Embrace the journey of learning, experimenting, and connecting with others through photography, and let your passion for the craft guide you to new heights.
